How to make a candle: Beeswax Tea Light Candles

Burning beeswax candles actually improves indoor air quality. Read about the benefits of burning beeswax candles here. The drawback is the price. Beeswax candles are more expensive than paraffin. Beeswax candles though are worth the extra price. And when you make them yourself you can save money, and you get the satisfaction of knowing that you can make more, whenever you want to.Beeswax gives off negative ions as it burns. Mold, dust, and petroleum pollutants have positive charges. The negative ions of the beeswax captures the indoor air pollutants and drops them to the ground, cleaning the air. An ionizing HEPA filter also works on this principle. Himalayan salt lamps do this, too. I have a set of Himalayan salt tea light holders that hold my beeswax tealights to multiply the benefit. More about that later.
When burning tea light candles you should burn the candle down until there is no wax left. Tea light candles that are burned more than halfway will not burn satisfactorily when they are relit.
On the other hand, votive candles should be burned for at least three hours before being snuffed. Less than 3 hours and the outside edge of the votive candle will not get hot enough to melt down. Votive candles should be placed in a safe candle holder to hold any spilled wax, and prevent fires.
If you buy the supplies as listed, you’ll have enough tea light cups, wick tabs, and wicks to make more tea lights. For each 25 to 30 tea lights that you want to make you’ll need 1 pound of beeswax. So if you want to make 100 tea lights, you’ll need 4 lbs. of beeswax.
Beeswax tea light candles are one of the easiest candles to make. Even the novice who is just learning how to make a candle will have immediate success with beeswax tea lights.
The water in the bottom pot prevents the wax from getting hot enough to spontaneously ignite. The tin and pot should be reserved for candle making, so don’t choose your best cookware. It’s very difficult to get the wax off the pot when you are done.
Check garage sales and thrift shops for suitable pots. A pasta pot is big enough to hold a rectangular olive oil can, which holds 3# of wax at a time.
Place the tin with beeswax in it inside the larger pot. Fill the large pot with water to within 2 inches of the top of the pot. Place on a heat source and wait for the wax to melt. I use my wood cookstove for melting wax and it can take 3 hours to melt 3# of wax.
Using a 1.75 mm crochet hook (US no. 7), thread the wick through the hole in the wick tab. Secure the wick in place with a dab of wax on the underside of the tab. While the wax is still warm, place the tab securely inside the tea light cup, centering it. Press down firmly to secure the wick tab in place. The wick has a cotton core, primed with wax. (See here for more about priming the wick). It will stand stiff and upright in the cup. If it doesn’t, help it with your fingers.

I use a smaller measuring cup to dip the wax out of the tin where the wax is melting. This is easier to control and I have less spills. Some sources say to melt beeswax to 170°F. I don’t measure the temperature of my wax. If it’s melted, it’s the right temperature.
Pour the wax into the tea light cup. Don’t overflow the cups. The wick should remain upright. Use a skewer to support it if necessary!
Candles that are lit too soon after pouring will not have the same burn time as properly aged candles. I like to make 50 tea lights at a time and age them for a few months in a cool, dark spot. I don’t actually put them in my freezer, though. I don’t need them to last more than 3 or 4 hours.
A small jam jar makes a pretty tea light holder. When you are finished burning the candle you can place the lid on the jar to keep the melted wax from spilling.
Special clay candle holders that are made just for tea lights.
You can also place tea light candles on a plate. But avoid placing them directly on a combustible surface like a wooden table. The cups can become quite hot when the wax has completely melted.
How to make rolled beeswax candles
How to make your own candle wicking
How to make beeswax luminaries
How to make molded beeswax candles
Simple Art of Making Taper Candles from My Healthy Green Family
DiY Beeswax Tapers from Homestead Honey
Beeswax Plastic Wrap Alternative (tutorial) from My Healthy Green Family
Beyond Candles and Salves — 35 Things You can Use Beeswax For from Schneiderpeeps
The difference between a tea light and a votive candle
Tea light candles are the small candles found in metal or plastic cups. Generally they burn for 4 to 5 hours. A votive candle stands on it’s own with no cup to contain the melting wax. They generally burn for 12 hours.When burning tea light candles you should burn the candle down until there is no wax left. Tea light candles that are burned more than halfway will not burn satisfactorily when they are relit.
On the other hand, votive candles should be burned for at least three hours before being snuffed. Less than 3 hours and the outside edge of the votive candle will not get hot enough to melt down. Votive candles should be placed in a safe candle holder to hold any spilled wax, and prevent fires.
How to make a candle: Tea lights
This tutorial makes 25 beeswax tea light candles.If you buy the supplies as listed, you’ll have enough tea light cups, wick tabs, and wicks to make more tea lights. For each 25 to 30 tea lights that you want to make you’ll need 1 pound of beeswax. So if you want to make 100 tea lights, you’ll need 4 lbs. of beeswax.
Beeswax tea light candles are one of the easiest candles to make. Even the novice who is just learning how to make a candle will have immediate success with beeswax tea lights.
To make these you’ll need:
- Tea light cups
- Number 2/0 wick with cotton core, primed
- Metal wick tabs
- 1 # Beeswax (about 2 cups)
- A can or pot to melt the wax in
- A pot to hold the can for the melting wax
- A heat source to melt the wax
4 easy steps to make a beeswax tea light candle
- Melt beeswax.
- Prepare the wicks for 25 wick tabs.
- Pour the wax into the tea light cups
- Let the wax harden.
Melt the beeswax
1 lb. of beeswax will make approximately 30 candles. Each tea light base holds 15ml/1 tbsp. of wax. Bees wax should be melted in a tin placed inside a pot of water.The water in the bottom pot prevents the wax from getting hot enough to spontaneously ignite. The tin and pot should be reserved for candle making, so don’t choose your best cookware. It’s very difficult to get the wax off the pot when you are done.
Check garage sales and thrift shops for suitable pots. A pasta pot is big enough to hold a rectangular olive oil can, which holds 3# of wax at a time.
Place the tin with beeswax in it inside the larger pot. Fill the large pot with water to within 2 inches of the top of the pot. Place on a heat source and wait for the wax to melt. I use my wood cookstove for melting wax and it can take 3 hours to melt 3# of wax.
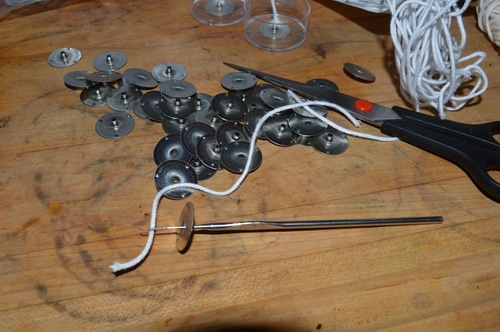

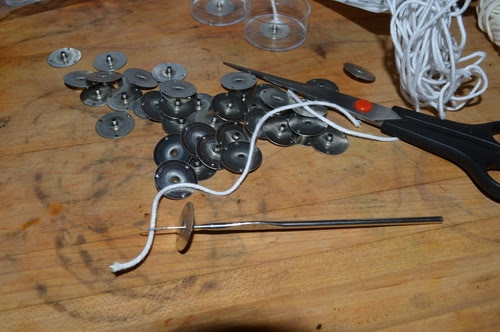
Prepare the wicks
Cut the prepared wicks to 1 1/4 inch lengths.Using a 1.75 mm crochet hook (US no. 7), thread the wick through the hole in the wick tab. Secure the wick in place with a dab of wax on the underside of the tab. While the wax is still warm, place the tab securely inside the tea light cup, centering it. Press down firmly to secure the wick tab in place. The wick has a cotton core, primed with wax. (See here for more about priming the wick). It will stand stiff and upright in the cup. If it doesn’t, help it with your fingers.
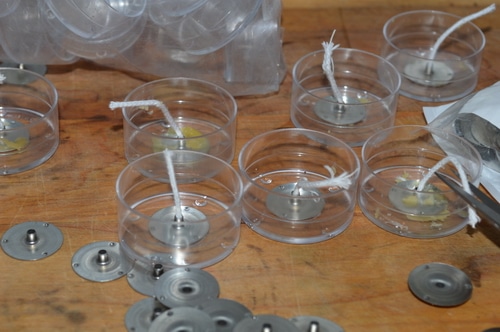
Pour the wax
I prepare the tin or plastic tea light molds for pouring by placing parchment paper on a baking sheet. Then I put the cups on the parchment paper. This way any spilled wax will lift off the parchment paper when cool, and I can remelt it.I use a smaller measuring cup to dip the wax out of the tin where the wax is melting. This is easier to control and I have less spills. Some sources say to melt beeswax to 170°F. I don’t measure the temperature of my wax. If it’s melted, it’s the right temperature.
Pour the wax into the tea light cup. Don’t overflow the cups. The wick should remain upright. Use a skewer to support it if necessary!
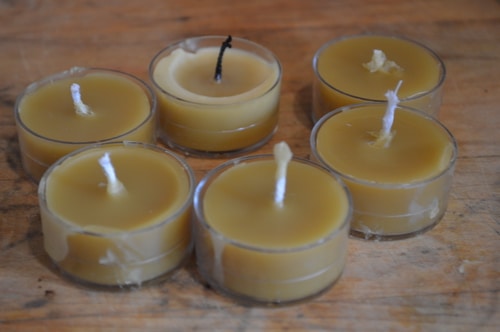
Allow the wax to harden
You want the wax to harden well before you light it. Folk wisdom says, “It’s best to put the candles in the freezer, AFTER they have hardened.” Let the candles cure for at least two weeks before you burn them. In this way they will burn for the maximum amount of time.Candles that are lit too soon after pouring will not have the same burn time as properly aged candles. I like to make 50 tea lights at a time and age them for a few months in a cool, dark spot. I don’t actually put them in my freezer, though. I don’t need them to last more than 3 or 4 hours.
Other tea light candle holders
Turn a wine glass upside down on a plate. Place some greenery or pine cones under the glass. Place a tea light on the foot of the glass.A small jam jar makes a pretty tea light holder. When you are finished burning the candle you can place the lid on the jar to keep the melted wax from spilling.
Special clay candle holders that are made just for tea lights.
You can also place tea light candles on a plate. But avoid placing them directly on a combustible surface like a wooden table. The cups can become quite hot when the wax has completely melted.
More “How to make a candle” tutorials:
How to make hand dipped beeswax candlesHow to make rolled beeswax candles
How to make your own candle wicking
How to make beeswax luminaries
How to make molded beeswax candles
Simple Art of Making Taper Candles from My Healthy Green Family
DiY Beeswax Tapers from Homestead Honey
More things you can use beeswax for
10 Great Uses for Beeswax from Learning and YearningBeeswax Plastic Wrap Alternative (tutorial) from My Healthy Green Family
Beyond Candles and Salves — 35 Things You can Use Beeswax For from Schneiderpeeps
Wow what a great blog, i really enjoyed reading this, good luck in your work. Candle making supplies
ReplyDelete